Posts

Showing posts with the label tutorial

Stash busting - three ideas

Image
Hair scrunchies With girls around, it seems that one can never have too many hair scrunchies! They are super easy to make with jelly roll strips and some elastics! ( Instructions on UK Quilters United ) Odds & sods bags Perfect little bag for storing some nappies, wet wipes, spare set of clothes and a small cuddly toy. You can make these fully reversible bags with two Fat Quarters. ( Instructions on UK Quilters United ) Art work display To avoid making wholes in the walls in our rental space, I made this art work display by using some hand printed charm squares. Once folded in half and sewn together, I filled them with dried yellow peas. ( Instructions on UK Quilters United )

Footmuff - new lower price

Image
With the colder season upon us in the northern hemisphere, I have lowered the price for the footmuff pattern and tutorial to just £2. The instructions include a generic size to make, as well as take you through how to make one that fits exactly to the size of your own buggy / pushchair / stroller. Make sure you fill in your email address correctly. Once your payment has been approved, a link will be displayed so you can download the PDF immediately. You'll also receive an email confirming your order (please check spam/junk). Useful links My  original blog post  with reviews (2011):  http://www.bossyoz.com/2011/08/tutorial-cosytoe-footmuff-bunting-bag.html Updated blog post  (2018)  http://www.bossyoz.com/2018/06/refresh-of-footmuff-pattern.html Link to  shop  location:  https://ukqu.co.uk/shop/patterns-4/footmuff-for-pushchair-pdf-downloadable-pattern-and-tutorial/ Other names: cosytoe, footmuff, bunting bag, pushchair bag

Refresh of the footmuff pattern

Image
= = =   Currently £4   = = = Almost seven years ago, I posted a tutorial of sorts, showing how you can make your own customised footmuff (also known as cosytoe, bunting bag, pushchair bag, etc). It has by far been my most popular post, attracting over 50k hits. After receiving a request to contribute to the Baby Feature (#babyfeatureUKQU) on the UKQU website , I have now updated the tutorial and turned it into a downloadable PDF pattern with images explaining the various steps of the process. As usual, it has taken longer to get the pattern and tutorial written up than actually making the item itself! Feedback on  my original tutorial  can be found in the comments section on the original post. Get your copy of the pattern To make your own customised footmuff, please head over to my UKQU shop ; whilst you are there, don’t miss the opportunity to also download some of my free patterns to make the UKQU logo (appliqué and FPP); just make sure you cli...

UK Mini Swap - three weeks left

Image
We are all busy The activity on the Instagram hashtags has been increasing as we are coming closer to the end of the first UK Mini Swap. Here are some of the progress photos found when searching for our hashtag on Instagram. For the latest entries, please see  https://instagram.com/explore/tags/ukminiswap/ New partners  A few people have dropped out and we have reallocated partners. A HUGE THANK YOU to those who has accepted making for a new partner this late in the process. Hopefully, this way, everyone who is making a mini, should also get one back. Labelling your mini How you label your mini is completely up to you, but as a minimum I suggest you add your name and that of the receipient plus UK Mini Swap. Perhaps also add the name of the mini, the date, your web page, etc. Earlier on, I was asked if I had any templates for the labels. I am no graphic designer, but as I like to try to be helpful, I have made two different designs; in colour and pure black ...

Wetwipes cover - TUTORIAL

Image
This cover fits UK standard packs of soft packs of baby wipes., e.g. the Pampers packs with 56 wipes. Approx finished size is 18 x 11 x 3 cm (7 1/4 x 4 1/4 x 2 1/4 inch) If this is the end of the tutorial, please click the link below saying READ MORE >>

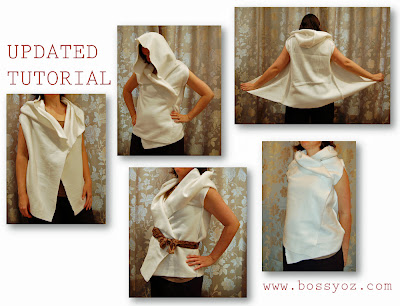
UPDATED - Fleece hoodie wrap re-creation tutorial

Image
This is an update of the  previous version  of the tutorial. N.B. I am using a small scale pattern to show the various steps. I have also added a Flickr group, as I would love to see your creations. Inspired by a fleece yoga wrap seen in a discussion forum and on Etsy, I decided to give it a go re-creating the garment. I have often done this with pieces I have found on the high street or in expensive boutiques; it is a challenge I really like! It actually wasn't that difficult, and all done in a few hours whilst eating breakfast, feeding the littlest one, doing laundry, emptying the dishwasher and accepting a delivery. It took me longer to type up this tutorial than put together the wrap thingy! If this is the end of the post, please click "read more" for the full tutorial! If there is more text below this paragraph, then you are already viewing the full tutorial.

Tutorial - cosytoe, footmuff, bunting bag, pushchair bag

Image
===  Currently £4  === BREAKING NEWS: The updated tutorial and pattern is now available in my UKQU shop . and in my PAYHIP shop . To see my article on the launch of the updated pattern - please click here . ===  Currently £4  ===

Pinning on your iPhone

Image
After having found Pinterest and completely fallen in love with this new visual way of keeping bookmarks, I downloaded the Pinterest App for my iPhone to be able to add pins when surfing on my phone. But, I still couldn't figure out how to then "transfer" the site I was looking at into the Pinterest App so I could bookmark / pin the inspirational image. Doh! It turned out that I actually didn't need the App at all; the only thing I needed to do was to use my "Pin It" bookmark (make sure you synch your phone so you have it on there too). When you find something you like; just click on the "Pin It" bookmark and you are given the opportunity to select the image. Easy! How to add the "Pin It" button to your bookmarks bar, please see Goodies @ Pinterest .