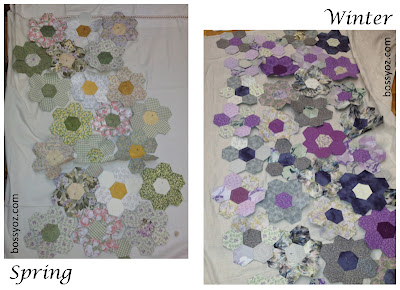
The hexagon quilt
The work with the pall for the Swedish Church in London is progressing, slowly. I published a photo of the middle section, the road, in October ( click for entry ). At the moment we are working on the four areas around the road, each representing a season. As everything is hand sewn it is a rather slow process, but great fun! Our latest thinking is that we should try to focus the summer season on blue, yellow and red to make sure they all match each other. Some of the "flowers" in the picture above has therefore been moved to other seasons or been put in the "perhaps" pile. A rough count in the photos shows that we have stitched together a little over 500 hexagons, plus the road; someone mentioned that we probably need around 2000...


Comments
Perhaps try copy+paste that link?
The fleece wrap really is super easy to make, and really comfy!!!
Good luck!
the front and hood is in one long rectangle (one for each side). I added approx 35 cm for the hood on top of the length for the front piece.
Hope this helps?! Unfortunately I can't seem to be able to find any photos showing the cut pieces :-(
Measure the total length from the bottom hem to the shoulder (over the opening for the sleeve, as in the left photo) and the to the middle of the back (at neck height, as in top right photo).
In my case these measures were 60 cm and 20 cm respectively, i.e. 80 cm in total.
Add to that the size of the hoodie, in my case 35 cm.
Hence the length of each of the combined front / hoodie pieces are 60+20+35=105 cm
The width of the pieces depend on your body measurements from side to side, over your tummy. In my case this was 45 cm.
Hence, adding some seam allowances, I cut two pieces, each 50 cm wide and 110 cm long.
Hopefully this make it a bit clearer?!
My pieces were
Back: 76cm x 76cm
front pieces (2) 61cm x 134cm
76cm (bottom hem to top of shoulder)
23cm (shoulder to mid neck)
35cm (hood)
Did I do something wrong?
My fronts were 50 cm, with yours at 60 cm each, that makes an extra 20 cm in 'depth'; which may be much too large for your head? Hence the jedi feel?
Also, might be worth to check that when you have basted the front panel to the side and then shoulder to middle of back neck, you have 35 cm ish left above for your hood. Perhaps you stretched the fabric?
It might be worth you 'rounding off' the hood's free edges to make it slimmer (closer to say 50cm).
Let me know if this helps!
Good luck!
Let you know how it works out...
Thanks
http://www.bossyoz.com/2012/11/updated-fleece-hoodie-wrap-re-creation.html