A newer post with updated instructions is available.
Get link
Facebook
X
Pinterest
Email
Other Apps
Comments
shelley said…
I just saw the same fleece yoga wrap on Pinterst...and then went to Etsy to find it. Next step..search the web for a tutorial, and here you are!! Yay!! You mention in the middle of your post to click "read more" below for the full tutorial. I can't seem to find the "read more" on your post. I think I can put everything together with just what is on your post, but the full tutorial would be great. THANKS!!!!
Dana L, the front and hood is in one long rectangle (one for each side). I added approx 35 cm for the hood on top of the length for the front piece. Hope this helps?! Unfortunately I can't seem to be able to find any photos showing the cut pieces :-(
Anonymous said…
Hi! I don't know if you still haven't found the pictures, I'm planning to sew for the first time & I wanted to start out with this --- Could you provide more pictures of the pieces?
Take your back piece (made based on a loose fitting t-shirt or from a pattern). Measure the total length from the bottom hem to the shoulder (over the opening for the sleeve, as in the left photo) and the to the middle of the back (at neck height, as in top right photo). In my case these measures were 60 cm and 20 cm respectively, i.e. 80 cm in total. Add to that the size of the hoodie, in my case 35 cm. Hence the length of each of the combined front / hoodie pieces are 60+20+35=105 cm The width of the pieces depend on your body measurements from side to side, over your tummy. In my case this was 45 cm. Hence, adding some seam allowances, I cut two pieces, each 50 cm wide and 110 cm long.
Hi I cut out and basted my pieces together. But my hood are came out HUGE. from front to back it's long and looks like a jedi or wiccan robe hood..:) Its about 90cm from the front of the hood to the neckline.
My pieces were
Back: 76cm x 76cm
front pieces (2) 61cm x 134cm 76cm (bottom hem to top of shoulder) 23cm (shoulder to mid neck) 35cm (hood)
It might be that the size of your front panels are making the hood too large. My fronts were 50 cm, with yours at 60 cm each, that makes an extra 20 cm in 'depth'; which may be much too large for your head? Hence the jedi feel? Also, might be worth to check that when you have basted the front panel to the side and then shoulder to middle of back neck, you have 35 cm ish left above for your hood. Perhaps you stretched the fabric? It might be worth you 'rounding off' the hood's free edges to make it slimmer (closer to say 50cm). Let me know if this helps! Good luck!
Yes, I figured that was the reason. I am going to try to cut down the hood in the front and I guess in the back.
Let you know how it works out...
Thanks
Anonymous said…
The link you posted takes me back to this page. Could you post a corrected link to the full tutorial?
BossyOz said…
If that is the case, then you are already seeing the full tutorial. There is only a few steps as the garment only includes three pieces. Simple and easy wrap to make.
Well, i cut down the hood and a bit of the width of the front panels. I decided to give it to my MIL for her birthday since she is a bit bigger and taller than me. I called it a snuggie wrap...LOL. Well if I was able to post a pic I would.
LeAnn and others, please note that I have now created a new extended version of this tutorial. This also includes a link to a Flickr group where you can share photos of your versions.
=== Currently £4 === BREAKING NEWS: The updated tutorial and pattern is now available in my UKQU shop . and in my PAYHIP shop . To see my article on the launch of the updated pattern - please click here . === Currently £4 ===
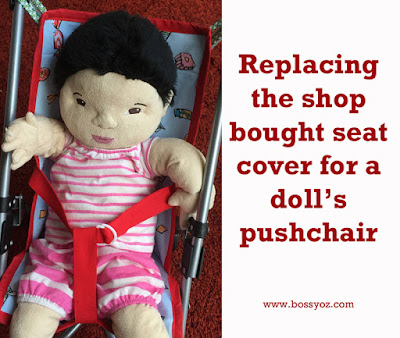
It didn't take long until the original flimsy seat for the doll's pushchair had been broken. Someone I know very well beat me to repairing it and did it "bloke style"...... silver tape and staples! Taking the original seat apart to use as a pattern would have been super easy, so I decided to make a new cover rather than try to mend the old one; after all it was now full of staples and sticky icky tape... However, when doing a google search, I came across a brilliant tutorial by Jaime at Pretty Prudent ( click for the link ). It even has standard measurements for the seat; perfect if you don't have the pushchair, but are making it as a surprise for someone else! For the new cover, I wanted something childish, but not too pink and girlie... Please ignore the measurements in the picture... This blue sweet fabric from the Charlie and the Chocolate Factory series (Roald Dahl) was perfect. For the back, I used a pink fabric with red tiny dots from IK...
Sign-ups are now CLOSED We call it the Late Joiners' or the Stragglers' version of the UK Mini Swap!!! Please read THE RULES . If you agree to all of them, and only then, please head over and sign up for the swap. Please take your time filling in the answers! I'll publish a "final call for sign-ups", so please don't rush! The better information you provide, the easier it'll be for your Partner to make a Mini Quilt which makes you happy! All levels are welcome. You MUST be active on social media. Sign-ups are now CLOSED December is a festive and busy month for most of us, hence please be patient whilst we prepare for and celebrate Christmas, and match you with your partner.


Comments
Perhaps try copy+paste that link?
The fleece wrap really is super easy to make, and really comfy!!!
Good luck!
the front and hood is in one long rectangle (one for each side). I added approx 35 cm for the hood on top of the length for the front piece.
Hope this helps?! Unfortunately I can't seem to be able to find any photos showing the cut pieces :-(
Measure the total length from the bottom hem to the shoulder (over the opening for the sleeve, as in the left photo) and the to the middle of the back (at neck height, as in top right photo).
In my case these measures were 60 cm and 20 cm respectively, i.e. 80 cm in total.
Add to that the size of the hoodie, in my case 35 cm.
Hence the length of each of the combined front / hoodie pieces are 60+20+35=105 cm
The width of the pieces depend on your body measurements from side to side, over your tummy. In my case this was 45 cm.
Hence, adding some seam allowances, I cut two pieces, each 50 cm wide and 110 cm long.
Hopefully this make it a bit clearer?!
My pieces were
Back: 76cm x 76cm
front pieces (2) 61cm x 134cm
76cm (bottom hem to top of shoulder)
23cm (shoulder to mid neck)
35cm (hood)
Did I do something wrong?
My fronts were 50 cm, with yours at 60 cm each, that makes an extra 20 cm in 'depth'; which may be much too large for your head? Hence the jedi feel?
Also, might be worth to check that when you have basted the front panel to the side and then shoulder to middle of back neck, you have 35 cm ish left above for your hood. Perhaps you stretched the fabric?
It might be worth you 'rounding off' the hood's free edges to make it slimmer (closer to say 50cm).
Let me know if this helps!
Good luck!
Let you know how it works out...
Thanks
http://www.bossyoz.com/2012/11/updated-fleece-hoodie-wrap-re-creation.html